
I finally started building my closet yesterday! When I placed my order for all of my plywood on Monday, I didn’t include the plywood for the washer and dryer cabinets (or cubbies, or surrounds — whatever you want to call them) because I wanted to get started building ASAP, and I those were the only pieces that I could have cut in the store and fit into my van to bring them home with me that day. And then, after getting my order placed and asking if someone could cut a piece of plywood for me, I was told that their saw wasn’t working at that time. 😀
He assured me that it would be fixed by the next morning (Tuesday morning), so I decided to wait. But it wasn’t fixed the next day. So instead of waiting, I ended up going to Home Depot to have them cut it for me. They have the exact same plywood that I purchased from Lowe’s for the rest of the closet.
All of that to say that I haven’t received my delivery yet (it’s coming today between 9:30am and 1:30pm), but I did at least have one sheet of plywood cut and brought it home so that I could at least build something. I just needed to see some sort of progress in this room.
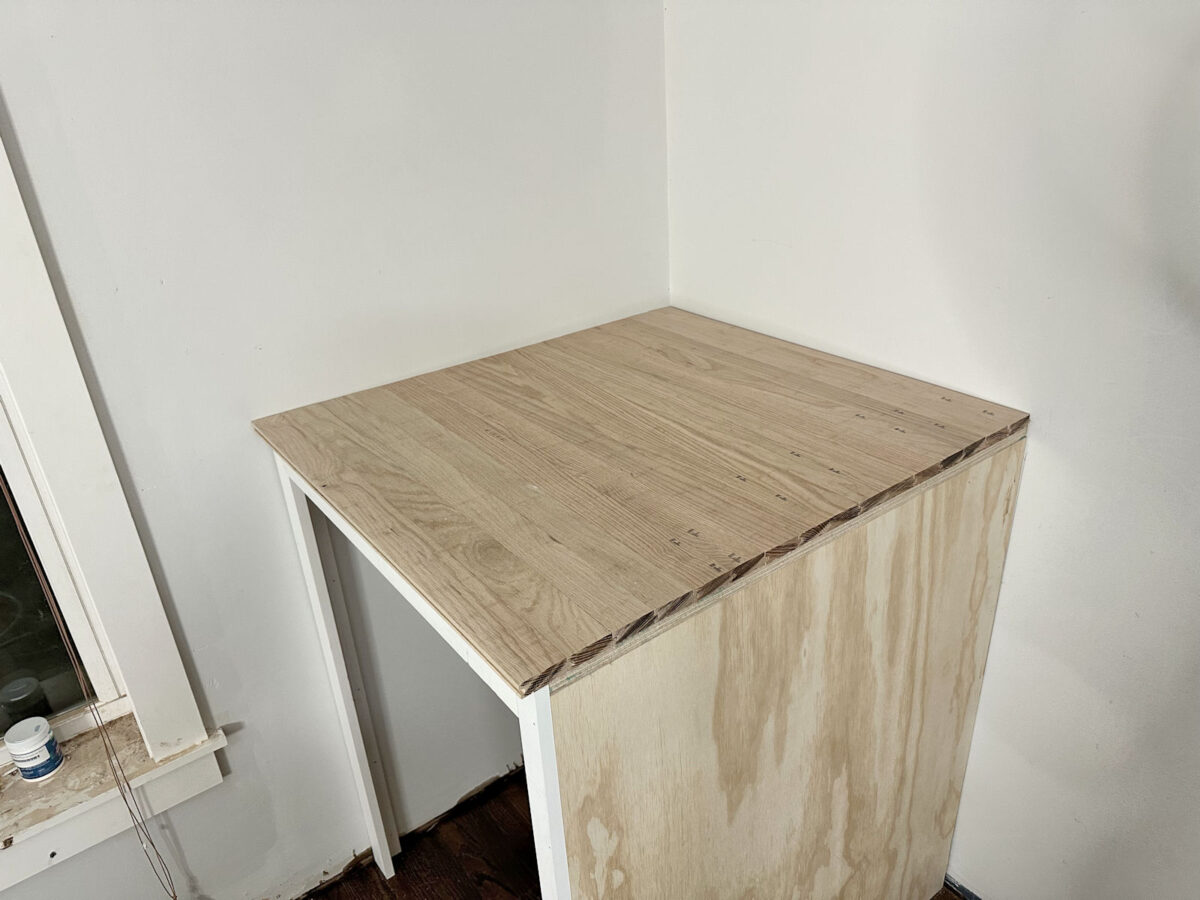
I only got the washer cabinet built yesterday because I don’t want to build the dryer cabinet until the electrician has run the new wire. The last thing I want to do is build something that will make his job harder and potentially cost me more money because of it. But here’s what the washer cabinet looks like so far.

The washer will actually stick out a few inches from the cabinet, but at least we can actually get a visual of how big and how far out the washer and dryer will go, and how much distance there will be between them.
Building this cabinet was incredibly simple. I didn’t want to use a lot of plywood that wouldn’t even show or serve a real purpose, so I didn’t use plywood on the back or the side against the side wall. Instead, I measured the finished width (33 inches) and then placed a 1×2 vertically at that measurement minus 3/4″ to make room for the 3/4″ plywood that would serve as the side of the cabinet.

Then I measured the depth on the side wall and placed another 1×2 vertically at that measurement.

And then I attached two more 1×2’s at the height of my plywood, which is 41 inches.

I nailed the plywood into the side edge of the 1×2 to form the space for the washer.

And to complete the form of the cabinet, I attached a piece of plywood to the top and nailed it into place all the way around, nailing it into the 1x2s on the side wall and back wall, and into the top edge of the plywood on the right side.

With each step, I used my framing square and level to make sure everything was square, level, and plumb before attaching them.

Then I trimmed out the front of the cabinet using 1x3s and 1x2s. I used a 1×3 at the wall so that the opening of the cabinet would clear the window trim and window sill with some additional width to spare since the door of the washer will open in that direction. And I used a 1×2 on the other side because that’s the side that will show, and I’ll be trimming out all of the closet cabinets with 1x2s. My floor isn’t perfectly level, so I have a feeling I’ll have to remove the top trim and cut it down a bit on my table saw for the washer to fit.

I had been looking at different options for countertops, and found myself gravitating towards butcherblock. I came very close to purchasing butcherblock from Lowe’s, and then I realized I have plenty of flooring left over from the flooring installation in the master bedroom suite. So I decided to use that instead since I’ve already paid for it. I cut the leftover red oak hardwood flooring pieces to 33 inches wide and placed them on top.

I haven’t actually attached them yet because I need to figure out if that top trim piece needs to be trimmed down before I finish the countertop. So right now, those boards are just lying on top, but they’re not glued or nailed down. And of course, I’ll add a 1×2 piece of red oak to the front edge and side edge to finish the countertop.

I’ve also purchased wood bleach for the countertops because I want them to be a light, natural wood color, so I need to remove some of the red from the red oak. I’ll tackle that later because I had to order the wood bleach on Amazon. This is the one I use (affiliate link), and it works very well.
So that’s as far as I got. But, hey! At least I finally built something! 😀
I really wanted to build the other one for the dyer, but again, I don’t want to make the electrician’s job any harder and possibly have to pay more. So I made myself wait on that. But y’all, I’m so anxious to build!! I’m so excited that the rest of my supplies will be delivered today by 1:30, and I’m hoping to have the rest of the day to build.
I also need to get the floors covered before I start the big stuff. This was such a small and simple project that I didn’t worry about the floors. But I’ll have to build the big cabinets inside this room, and there’s no way I’ll be building those big cabinets in here right on top of my newly finished hardwood floors. So I need to get those covered and protected before I go any further.
But I’m so happy to see a little bit of progress…finally. Now I just need to figure out how I’m going to get the washer and dryer out of the sunroom and moved into this room. I’m sure I’ll need to call in reinforcements for that. I seriously doubt I’ll be able to do it by myself. But y’all probably know me well enough by now to know that I’m at least going to try to do it myself before I call for help. 😀
The A2D Daily:

Addicted 2 Decorating is where I share my DIY and decorating journey as I remodel and decorate the 1948 fixer upper that my husband, Matt, and I bought in 2013. Matt has M.S. and is unable to do physical work, so I do the majority of the work on the house by myself. You can learn more about me here.
Trending Products